


This Gatsby post was written for Gatsby 3 and is no longer maintained. If you would like to try out SvelteKit or Astro, check out the maintained posts which are based on those. Astro lets you continue to use React but also with partial hydration which can be used to provide an enhanced user experience. SvelteKit offers server side rendering as well as static site generation. See the post on how performance improved switching from Gatsby to Astro for more background.
✨ Rust Serverless Functions on Netlify #
Today we'll look at how to use Rust Serverless Functions on Netlify. This is a relatively new feature on Netlify. I think it was introduced early 2021. In recent posts, we have looked at using Gatsby Cloud Functions in your Gatsby App, both on Netlify and also the new native support baked into Gatsby. Both of those implementations use a Node.js environment to run your serverless functions. Using Netlify, however, you are not limited to Node and can run Go and Rust among other languages.
Why use Serverless Rust? #
Why use Rust in a serverless function? The simple answer is that there is potential for your code to run a lot faster. If you pay for functions usage by the second, then a speed optimization with save you cash. Also, typically there is a limit to the maximum runtime for a serverless function invocation. So if you have meaty code, you might need optimized Rust functions (instead of JavaScript) to ensure it completes in time.
Rust is a compiled, rather than interpreted language, meaning to use the code we generate machine code (customized for a particular process architecture). At run time, unlike for JavaScript or even Java, there is no interpretation to be done (taking the developer's code and translating it into something the processor can understand). Compiled code has the potential to run a lot faster. The downside, however, is that the code has to be compiled (only once) before it can be run and on top, the compiled code is not so portable. Essentially, you decide which machine architecture you want to run it on at compile time. These drawbacks don't really pose significant hurdles when looking to serverless functions. We will see how to compile for the right architecture for Netlify. On top, we will tweak the build process for the site to compile the Rust function.
Why Else use Serverless Rust? #
If you want other reasons to run Rust, it has been one of the most popular languages to learn of late. It is a great systems language built to address some shortcomings of more traditional languages like C and C++. It is also designed to be more secure. The security and safety features introduce some complications, but there is some excellent documentation on learning Rust, affectionately known as The Book .
Enough about how good Rust is already! Let's look at what we're building.
🧱 What We’re Building #
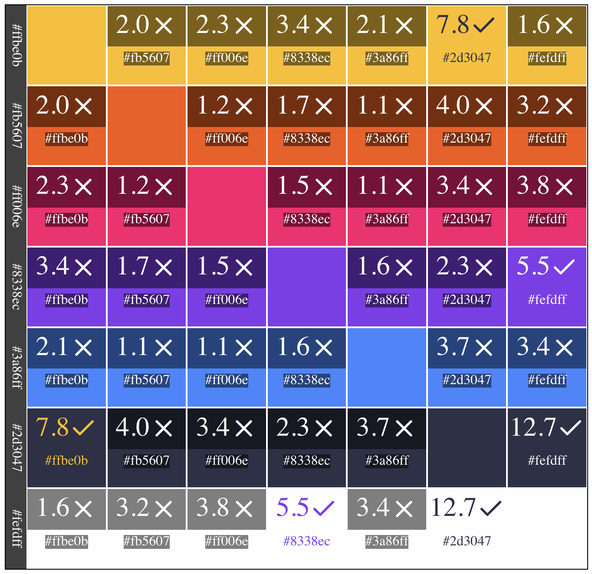
Today we'll look at an accessibility tool to use when designing websites. You've picked your colour scheme for your website. You start to have some ideas on which colours you want to use as text and background colours for the different elements. But hold on a jiffy, do you know which of those combinations are accessible? When there is low contrast between text and its background, the text can be difficult for partially sighted people to read. Contrast ratio is our friend here. By checking the contrast ratio between text colour and background colour is 4.5 or higher , we can help partially sighted users out. This project will build a tool to check contrast ratios between theme colours. We input all our theme colours, and it tells us the contrast ratios between them, using a serverless function to do the maths.

In reality, there is not too much maths and processing needed to work out the contrast ratios, so you could run JavaScript in the client browser. But, I thought it might be a nice way to dip a toe into Rust serverless functions on Netlify pond. In fact, I have already extended this code for more computationally intensive calculations. The Rainbow Tool is currently in Beta and is a handy accessibility tool for ensuring overlay text on images has a high enough contrast ratio (using serverless rust with Netlify).
Anyway, for this project, the idea is we input the colours from our theme on a static Gatsby site. It then calls the Rust serverless function to get the contrast ratios for every colour combination. The site outputs the ratios into a grid, making it easy to see which combinations are safe to use.
How is using Serverless Rust different to using Serverless JavaScript? #
The main difference between running Rust serverless functions and JavaScript ones is that we need to compile the code to a binary and run that binary whenever the serverless function get calls. With JavaScript serverless functions, we just interpret and run the code on the server. Thanks to Chris Biscardi for helping me get my head around this!
Does this sound like something you would like to build? Let's crack on then!
⚓️ Let’s Set Sail… Weigh Anchor! #
We will use the Gatsby Climate Starter . We won't add that much styling or smooth all the sharp corners, so we can focus on the Rust. Clone the starter and spin up a new site:
git clone https://github.com/rodneylab/gatsby-starter-climate.git gatsby-serverless-rustcd gatsby-serverless-rustnpm installcp .env.EXAMPLE .env.developmentcp .env.EXAMPLE .env.productiongatsby develop
🗳 Poll #
⚙️ Rust Serverless with Netlify Functions Configuration #
There's more than one way to do this. You can compile the Rust code locally and commit the compiled binary to your repo. In this case, you need to cross-compile to make sure the binary can run on Netlify. Instead, we will compile the Rust code into a binary on Netlify's servers, during the Gatsby site build process. This does mean your build will take a little longer (Netlify do some caching, so first build is the slowest). Chris Biscardi has written a good post on compiling the Netlify Serverless Function locally and committing the binary to your repo if you're interested in seeing how that works.
The first important thing we need to do is ensure we compile a binary which is
compatible with the processor architecture used on Netlify servers. We can do
this using a rust-toolchain file in our project's
root directory. The target processor architecture needs to be x86_64-unknown-linux-musl. Create and edit the rust-toolchain file:
[toolchain]channel = "stable"components = ["rustfmt", "clippy"]targets = ["x86_64-unknown-linux-musl"]
Next up, we want to change our build command to include compilation of the
Rust binary. We will use a Makefile to help generate the binary, so all we
need to do is add the make command to the existing
build command in netlify.toml in the project's root
directory:
1 [build]2 command = "make build && npm run build"3 environment = { GATSBY_CPU_COUNT = "1" }4 functions = "netlify/functions"5 publish = "public"
Makefile #
You probably guessed we need to create a Makefile now! Create it in
the project's root directory:
1 .PHONY: build deploy2 3 help: ## Show this help4 @awk 'BEGIN {FS = ":.*?## "} /^[a-zA-Z_-]+:.*?## / {sub("\\\\n",sprintf("\n%22c"," "), $$2);printf "\033[36m%-20s\033[0m %s\n", $$1, $$2}' $(MAKEFILE_LIST)5 6 build: ## Build static binary and put itin the functions directory.7 @cargo build --release --target x86_64-unknown-linux-musl8 @cargo install --force cargo-strip9 @cargo strip --target x86_64-unknown-linux-musl10 @mkdir -p netlify/functions11 @cp target/x86_64-unknown-linux-musl/release/get-contrast-ratios netlify/functions12 13 deploy: build ## Deploy the site using Netlify's CLI14 @netlify deploy --prod
Our build target within the make file creates a
netlify/functions directory if it does not already
exist, and then copies the binary there. This is exactly where Netlify will look
for the function binary based on our netlify.toml file. The cargo strip command is not strictly
necessary. It can make the binary much smaller. I haven't run tests, but I would
imagine it is more important to run this when speed is an issue, as I would expect
your functions can spin up a touch quicker with a smaller binary. Interested to
hear if you have run some tests yourself. Drop a comment or get in touch another
way if you have. In line 8 we are just ensuring
we have the cargo-strip tool installed.
Be sure to change get-contrast-ratios in line 11 to whatever you call your binary when you use this code in your own projects.
🖥 Let’s Write Some Rust #
In the src directory, create main.rs. Add the following content to it:
1 use netlify_lambda_http::{2 handler,3 lambda::{run, Context},4 IntoResponse, Request,5 };6 use photon_rs::Rgb;7 use serde::Deserialize;8 use serde_json::json;9 10 type Error = Box<dyn std::error::Error + Send + Sync + 'static>;11 12 #[tokio::main]13 async fn main() -> Result<(), Error> {14 run(handler(respond_with_contrast_ratios)).await?;15 Ok(())16 }17 18 #[derive(Deserialize)]19 struct ClientRequest {20 colours: Vec<String>,21 }22 23 async fn respond_with_contrast_ratios(24 request: Request,25 _: Context,26 ) -> Result<impl IntoResponse, Error> {27 let body = request.body();28 let body: ClientRequest = serde_json::from_slice(&body)?;29 let colours = body.colours;30 31 let mut result = Vec::new();32 let mut rgb_colours = Vec::new();33 34 for (i, value_i) in colours.iter().enumerate() {35 rgb_colours.push(get_rgb_from_hex(&colours[i]));36 for (j, value_j) in colours.iter().enumerate() {37 if j < i {38 result.push(json!({ "color": value_i, "backgroundColor": value_j, "contrastRatio": contrast_ratio(&rgb_colours[i], &rgb_colours[j])}));39 }40 }41 }42 43 Ok(json!({ "contrastRatios": result }))44 }
This code won't work yet. It has the guts (which do the computation) removed, just so we can focus on how to set up the rust serverless function and provide the expected response. Let's have a look at what we have, starting at the top and working our way down.
The most import use crate here is netlify_lambda_http. This was forked from an AWS Lambda repo to add extra functionality. We use photon_rs only for a helper method from the Rgb struct. To be able to receive a JSON body
and send one in the response, we use serde and serde_json. This is quite a handy crate (its name comes from a contraction of
“serialize deserialize”.)
Next up is our main function, which will take the request and pass it on to respond_with_contrast_ratio before actually responding with the JSON body.
JSON in Serverless Rust #
At lines 18 – 21, we define the
shape and types of the incoming request. This is important as Rust is a
strongly typed language. The JSON passed from our client code will just be a
JSON object containing a single top level field, which is an array containing
the hex codes of the colours in our site theme:
{ "colours": [ '#ffbe0b', '#fb5607', '#ff006e', '#8338ec', '#3a86ff', '#2d3047', '#fefdff', ]}
We will have Rust treat that array as a Vec.
Remember to add other fields as the API changes for the code to continue
compiling successfully!
The final function is where the main work gets started. The code in lines 28 – 29 relies on us defining
the ClientRequest struct we just discussed. The
result will also contain an array. This will just have one element for each unique
colour combination:
{ "contrastRatios": [ { color: '#ffbe0b', backgroundColor: '#fb5607', contrastRatio: 2.0 }, { color: '#ffbe0b', backgroundColor: '#ff006e', contrastRatio: 2.3 }, { color: '#ffbe0b', backgroundColor: '#8338ec', contrastRatio: 3.4 }, ... ]}
You see in line 38 it is pretty easy to generate
a JSON response, using serde. In a final version of a client project, we would add
more type checking but for the sake of showing how to use Serverless Rust with Netlify,
there's just about enough! You might also add more server side validation of inputs.
The final, missing piece of the serverless puzzle is our Cargo.toml file. This tells the compiler what to call the output binary (make sure this
matches the name you use in the Makefile):
[package]name = "get-contrast-ratios"version = "0.1.0"authors = ["Rodney Lab <@askRodney>"]edition = "2018" # See more keys and their definitions at https://doc.rust-lang.org/cargo/reference/manifest.html [dependencies]netlify_lambda_http = "0.2"photon-rs = "0.3.1"serde = "1.0.117"serde_json = "1.0.59"tokio = { version = "1.0.1", features = ["macros"] }
The file also lists the crates we need to build it, and the versions of those crates we need.
You will need to paste in the complete src/main.rs:
src/main.rs — click to expand code.
1 use netlify_lambda_http::{2 handler,3 lambda::{run, Context},4 IntoResponse, Request,5 };6 use photon_rs::Rgb;7 use serde::Deserialize;8 use serde_json::json;9 10 type Error = Box<dyn std::error::Error + Send + Sync + 'static>;11 12 #[tokio::main]13 async fn main() -> Result<(), Error> {14 run(handler(respond_with_contrast_ratios)).await?;15 Ok(())16 }17 18 #[derive(Deserialize)]19 struct ClientRequest {20 colours: Vec<String>,21 }22 23 fn contrast_ratio_from_relative_luminance(24 relative_luminance_1: &f64,25 relative_luminance_2: &f64,26 ) -> f64 {27 if relative_luminance_1 < relative_luminance_2 {28 (relative_luminance_2 + 0.05) / (relative_luminance_1 + 0.05)29 } else {30 (relative_luminance_1 + 0.05) / (relative_luminance_2 + 0.05)31 }32 }33 34 fn contrast_ratio(colour_1: &Rgb, colour_2: &Rgb) -> f64 {35 contrast_ratio_from_relative_luminance(36 &relative_luminance(colour_1),37 &relative_luminance(colour_2),38 )39 }40 41 /// convert either #000 or #000000 format colour to photon_rs::Rgb42 fn get_rgb_from_hex(hex_string: &str) -> photon_rs::Rgb {43 let colour_hex = hex_string.trim();44 let hex_string_length = Some(hex_string.len());45 match hex_string_length {46 Some(7) => {47 let r = hex_to_decimal(&colour_hex[1..3]);48 let g = hex_to_decimal(&colour_hex[3..5]);49 let b = hex_to_decimal(&colour_hex[5..7]);50 Rgb::new(r, g, b)51 }52 Some(4) => {53 let r_hex = &colour_hex[1..2];54 let g_hex = &colour_hex[2..3];55 let b_hex = &colour_hex[3..4];56 let long_format_hex =57 format!("#{}{}{}{}{}{}", r_hex, r_hex, g_hex, g_hex, b_hex, b_hex);58 get_rgb_from_hex(&long_format_hex)59 }60 _ => panic!("Check rgb input"),61 }62 }63 64 /// convert an octet from hex to decimal65 fn hex_to_decimal(hex_string: &str) -> u8 {66 let result = match u8::from_str_radix(&hex_string, 16) {67 Ok(num) => num,68 Err(_) => 0,69 };70 result71 }72 73 fn relative_luminance_from_colour_ratio(colour_ratio: &RgbRatio) -> f64 {74 let linear_r = if colour_ratio.get_red() <= 0.03928 {75 colour_ratio.get_red() / 12.9276 } else {77 ((colour_ratio.get_red() + 0.055) / 1.055).powf(2.4)78 };79 let linear_g = if colour_ratio.get_green() <= 0.03928 {80 colour_ratio.get_green() / 12.9281 } else {82 ((colour_ratio.get_green() + 0.055) / 1.055).powf(2.4)83 };84 let linear_b = if colour_ratio.get_blue() <= 0.03928 {85 colour_ratio.get_blue() / 12.9286 } else {87 ((colour_ratio.get_blue() + 0.055) / 1.055).powf(2.4)88 };89 0.2126 * linear_r + 0.7152 * linear_g + 0.0722 * linear_b90 }91 92 fn relative_luminance(colour: &Rgb) -> f64 {93 let standard_rgb_colour = rgb_ratio(colour);94 relative_luminance_from_colour_ratio(&standard_rgb_colour)95 }96 97 async fn respond_with_contrast_ratios(98 request: Request,99 _: Context,100 ) -> Result<impl IntoResponse, Error> {101 let body = request.body();102 let body: ClientRequest = serde_json::from_slice(&body)?;103 let colours = body.colours;104 105 let mut result = Vec::new();106 let mut rgb_colours = Vec::new();107 108 for (i, value_i) in colours.iter().enumerate() {109 rgb_colours.push(get_rgb_from_hex(&colours[i]));110 for (j, value_j) in colours.iter().enumerate() {111 if j < i {112 result.push(json!({ "color": value_i, "backgroundColor": value_j, "contrastRatio": contrast_ratio(&rgb_colours[i], &rgb_colours[j])}));113 }114 }115 }116 117 Ok(json!({ "contrastRatios": result }))118 }119 120 #[derive(Debug, PartialEq)]121 struct RgbRatio {122 r: f64,123 g: f64,124 b: f64,125 }126 127 impl RgbRatio {128 fn get_red(&self) -> f64 {129 self.r130 }131 fn get_green(&self) -> f64 {132 self.g133 }134 fn get_blue(&self) -> f64 {135 self.b136 }137 }138 139 fn rgb_ratio(colour: &Rgb) -> RgbRatio {140 RgbRatio {141 r: colour.get_red() as f64 / 255.0,142 g: colour.get_green() as f64 / 255.0,143 b: colour.get_blue() as f64 / 255.0,144 }145 }
Let me know if you have any questions on this.
That's the serverless function complete. Our Makefile will save our function to netlify/functions/get-contrast-ratios. That means to trigger the function from our client, we need to POST the
JSON data to the .netlify/functions/get-contrast-ratios endpoint/. Let's try that next!
🧒🏽 Back to the Client Side #
Now we have the serverless Rust functions wrapped up, let's make the app a bit more full stack, and put
some functionality into the client! Start by installing a few extra packages:
npm i axios formik lodash.isobject
We use axios to submit our data to the function. Formik is used to create the
inputs for the colours. The lodash function is used in the FormikErrorFocus which we will add shortly.
Next, edit src/index.jsx:
1 import axios from 'axios';2 import { Form, Formik } from 'formik';3 import { graphql } from 'gatsby';4 import PropTypes from 'prop-types';5 import React, { useState } from 'react';6 import FormikErrorFocus from '../components/FormikErrorFocus';7 import { CrossIcon, TickIcon } from '../components/Icons';8 import TextInputField from '../components/InputField';9 import { PureLayout as Layout } from '../components/Layout';10 import { PureSEO as SEO } from '../components/SEO';11 import {12 colourGrid,13 colourGridElement,14 colourGridElementContent,15 colourText,16 colourTextLowContrast,17 contrastRatioContainer,18 contrastRatioContainerLowContrast,19 contrastRatioText,20 formContainer,21 formContent,22 rowLabel,23 } from './index.module.scss';24 25 const MIN_CONTRAST_RATIO = 4.5;26 27 const validColour = (colour) => /^#([A-Fa-f0-9]{6}|[A-Fa-f0-9]{3})$/i.test(colour);28 29 export default function Home({ data }) {30 const [showContrastRatios, setShowContrastRatios] = useState(false);31 const [contrastRatios, setContrastRatios] = useState([32 { color: '#ffbe0b', backgroundColor: '#fb5607', contrastRatio: 9.9 },33 ]);34 const [colours, setColours] = useState([35 '#ffbe0b',36 '#fb5607',37 '#ff006e',38 '#8338ec',39 '#3a86ff',40 '#2d3047',41 '#fefdff',42 ]);43 const [currentColours, setCurrentColours] = useState([44 '#ffbe0b',45 '#fb5607',46 '#ff006e',47 '#8338ec',48 '#3a86ff',49 '#2d3047',50 '#fefdff',51 ]);52 53 const getContrastRatio = ({ color, backgroundColor }) => {54 const result =55 contrastRatios.find(56 (element) => element.color === color && element.backgroundColor === backgroundColor,57 ) ||58 contrastRatios.find(59 (element) => element.color === backgroundColor && element.backgroundColor === color,60 );61 return result?.contrastRatio || 1.0;62 };63 64 const handleColourChange = (event, { index, setErrors }) => {65 const currentValue = event.currentTarget.value;66 let errorMessage = '';67 setColours([...colours.slice(0, index), event.target.value, ...colours.slice(index + 1)]);68 if (validColour(currentValue)) {69 setCurrentColours([70 ...currentColours.slice(0, index),71 event.target.value,72 ...currentColours.slice(index + 1),73 ]);74 } else {75 errorMessage = 'Enter colour in #000000 format';76 }77 const errors = {};78 errors[`A;colours-${index}`A;] = errorMessage;79 setErrors(errors);80 };81 82 const handleSubmit = async () => {83 try {84 const response = await axios({85 url: '.netlify/functions/get-contrast-ratios',86 method: 'POST',87 data: {88 colours: currentColours,89 },90 });91 setContrastRatios(response.data.contrastRatios);92 setShowContrastRatios(true);93 } catch (error) {94 if (error.response) {95 console.log('Server responded with non 2xx code: ', error.response.data);96 } else if (error.request) {97 console.log('No response received: ', error.request);98 } else {99 console.log('Error setting up response: ', error.message);100 }101 }102 };103 104 const validate = () => {105 const errors = {};106 colours.forEach((element, index) => {107 if (!validColour(element)) {108 errors[`A;colour${index}`A;] = 'Enter colour in #000000 format';109 }110 });111 return errors;112 };113 114 return (115 <>116 <SEO117 data={data}118 title="Home"119 metadescription="Climate - Gatsby v3 MDX Blog Starter - starter code by Rodney Lab to help you get going on your next blog site"120 />121 <Layout data={data}>122 <>123 <header>124 <h1>Gatsby-Serverles-Rust</h1>125 </header>126 <Formik127 initialValues={{128 'colour-0': colours[0],129 'colour-1': colours[1],130 'colour-2': colours[2],131 'colour-3': colours[3],132 'colour-4': colours[4],133 'colour-5': colours[5],134 'colour-6': colours[6],135 }}136 onSubmit={handleSubmit}137 validate={validate}138 >139 {({ isSubmitting, setErrors }) => (140 <FormikErrorFocus>141 <Form className={formContainer} id="colour-form" name="colour">142 <div className={formContent}>143 {colours.map((_, index) => (144 <TextInputField145 isRequired={false}146 id={`A;colour-${index}`A;}147 name={`A;colour${index}`A;}148 onChange={(event) => {149 handleColourChange(event, { index, setErrors });150 }}151 placeholder="#ffffff"152 label={`A;Colour ${index + 1}`A;}153 title={`A;Colour ${index + 1}`A;}154 type="text"155 value={colours[index]}156 />157 ))}158 <button type="submit" disabled={isSubmitting}>159 Get Contrast Ratios160 </button>161 </div>162 </Form>163 </FormikErrorFocus>164 )}165 </Formik>166 {showContrastRatios ? (167 <div className={colourGrid}>168 {currentColours.map((outerElement, outerIndex) => (169 <>170 <div className={rowLabel} style={{ gridArea: `A;area-row-start-${outerIndex}`A; }}>171 {outerElement}172 </div>173 {currentColours.map((innerElement, innerIndex) => {174 const contrastRatio = getContrastRatio({175 color: innerElement,176 backgroundColor: outerElement,177 }).toFixed(1);178 return (179 <div180 className={colourGridElement}181 key={`A;${innerElement}-${outerElement}`A;}182 style={{183 gridArea: `A;area-${outerIndex}-${innerIndex}`A;,184 color: innerElement,185 backgroundColor: outerElement,186 }}187 >188 {innerIndex === outerIndex ? null : (189 <div className={colourGridElementContent}>190 <div191 className={`A;${contrastRatioContainer}${192 contrastRatio < MIN_CONTRAST_RATIO193 ? `A; ${contrastRatioContainerLowContrast}`A;194 : ''195 }`A;}196 >197 <span className={contrastRatioText}>{contrastRatio} </span>198 {contrastRatio > MIN_CONTRAST_RATIO ? <TickIcon /> : <CrossIcon />}199 </div>200 <p>201 <span202 className={`A;${colourText}${203 contrastRatio < MIN_CONTRAST_RATIO204 ? `A; ${colourTextLowContrast}`A;205 : ''206 }`A;}207 >208 {innerElement}209 </span>210 </p>211 </div>212 )}213 </div>214 );215 })}216 </>217 ))}218 </div>219 ) : null}220 </>221 </Layout>222 </>223 );224 }225 226 Home.propTypes = {227 data: PropTypes.shape({228 site: PropTypes.shape({229 buildTime: PropTypes.string,230 }),231 }).isRequired,232 };233 234 export const query = graphql`A;235 query Home {236 site {237 ...LayoutFragment238 ...SEOFragment239 }240 }241 `;
I don't want to get off-topic, so won't talk about the contents of this file.
Nonetheless, please get in touch or leave a comment below if you would like
some explanation of some parts of it. I have left console logs in to help with
debugging if needed. The most important line of the code here is line 85 where we call the serverless function.
We imported a couple of Icons in the index.jsx file,
which we need to define. Let's do that now, adding these exports to src/components/Icons.jsx:
src/components/Icons.jsx — click to expand code.
1 export const CrossIcon = () => (2 <span role="img" aria-label="cross">3 <FeatherIcon icon="x" size="32" />4 </span>5 );6 export const TickIcon = () => (7 <span role="img" aria-label="tick">8 <FeatherIcon icon="check" size="32" />9 </span>10 );
Next, for styling, create the file src/pages/index.module.scss and give it the following content:
src/pages/index.module.scss — click to expand code.
1 @import '../styles/styles.scss';2 3 .form-container {4 width: 100%;5 button {6 width: 100%;7 }8 }9 10 .form-content {11 width: 60%;12 margin: $spacing-12 auto;13 }14 15 .colour-grid {16 display: grid;17 grid-template-columns: auto repeat(7, 1fr);18 grid-template-areas:19 'area-row-start-0 area-0-0 area-0-1 area-0-2 area-0-3 area-0-4 area-0-5 area-0-6'20 'area-row-start-1 area-1-0 area-1-1 area-1-2 area-1-3 area-1-4 area-1-5 area-1-6'21 'area-row-start-2 area-2-0 area-2-1 area-2-2 area-2-3 area-2-4 area-2-5 area-2-6'22 'area-row-start-3 area-3-0 area-3-1 area-3-2 area-3-3 area-3-4 area-3-5 area-3-6'23 'area-row-start-4 area-4-0 area-4-1 area-4-2 area-4-3 area-4-4 area-4-5 area-4-6'24 'area-row-start-5 area-5-0 area-5-1 area-5-2 area-5-3 area-5-4 area-5-5 area-5-6'25 'area-row-start-6 area-6-0 area-6-1 area-6-2 area-6-3 area-6-4 area-6-5 area-6-6';26 border: $spacing-px solid #000;27 }28 29 .row-label {30 background-color: rgba($color: #000000, $alpha: 0.75);31 color: #fff;32 writing-mode: vertical-rl;33 height: 100%;34 text-align: center;35 }36 37 .colour-grid-element {38 display: flex;39 border: $spacing-px solid #fff;40 }41 42 .colour-grid-element-content {43 display: flex;44 width: 100%;45 flex-direction: column;46 justify-content: space-between;47 .contrast-ratio-text {48 font-size: $font-size-4;49 }50 .contrast-ratio-text-low-contrast {51 color: #fff;52 background: rgba($color: #000000, $alpha: 0.5);53 }54 .colour-text {55 text-align: center;56 }57 .colour-text-low-contrast {58 color: #fff;59 background: rgba($color: #000000, $alpha: 0.5);60 }61 62 p {63 text-align: center;64 }65 }66 67 .contrast-ratio-container {68 display: flex;69 align-items: flex-end;70 justify-content: center;71 72 p {73 margin-bottom: $spacing-0;74 }75 }76 77 .contrast-ratio-container-low-contrast {78 color: #fff;79 background: rgba($color: #000000, $alpha: 0.5);80 }
Then we create the FormikErrorFocus component. This
will just help highlight any erroneous inputs, helping the user work out where there
is an error:
src/components/FormikErrorFocus.jsx — click to expand code.
1 import { useFormikContext } from 'formik';2 import isObject from 'lodash.isobject';3 import { useEffect } from 'react';4 5 const getFirstErrorKey = (object, keys = []) => {6 const firstErrorKey = Object.keys(object)[0];7 if (isObject(object[firstErrorKey])) {8 return getFirstErrorKey(object[firstErrorKey], [...keys, firstErrorKey]);9 }10 return [...keys, firstErrorKey].join('.');11 };12 13 const FormikErrorFocus = ({ children }) => {14 const formik = useFormikContext();15 16 useEffect(() => {17 if (!formik.isValid && formik.submitCount > 0) {18 const firstErrorKey = getFirstErrorKey(formik.errors);19 if (global.window.document.getElementsByName(firstErrorKey).length) {20 global.window.document.getElementsByName(firstErrorKey)[0].focus();21 }22 }23 }, [formik.submitCount, formik.isValid, formik.errors]);24 return children;25 };26 27 export default FormikErrorFocus;
Finally, we need to define the input elements and style them:
src/components/InputField.jsx — click to expand code.
1 import { ErrorMessage, Field, useField } from 'formik';2 import PropTypes from 'prop-types';3 import React from 'react';4 import { isBrowser } from '../utilities/utilities';5 import { container, errorText, field, labelFieldContainer } from './InputField.module.scss';6 7 const TextInputField = ({8 className,9 id,10 innerRef,11 isRequired,12 label,13 onChange,14 name,15 placeholder,16 step,17 type,18 value,19 }) => {20 const [, meta] = useField(id, name, placeholder, type);21 22 return (23 <div className={container}>24 <div className={labelFieldContainer}>25 <label htmlFor={id}>{label}</label>26 <Field27 as="input"28 id={id}29 aria-invalid={meta.error && meta.touched ? 'true' : null}30 aria-describedby={meta.error && meta.touched ? `${id}-error` : null}31 aria-required={isRequired ? true : null}32 className={`${className} ${field}`}33 name={name}34 onChange={onChange}35 placeholder={placeholder}36 step={step}37 type={type}38 value={value}39 innerRef={innerRef}40 />41 </div>42 <small className={errorText}>43 <ErrorMessage id={`${id}-error`} name={name} />44 </small>45 </div>46 );47 };48 49 TextInputField.defaultProps = {50 className: '',51 innerRef: null,52 isRequired: null,53 onChange: null,54 step: '1',55 value: '',56 };57 58 TextInputField.propTypes = {59 innerRef: isBrowser60 ? PropTypes.oneOfType([61 PropTypes.func,62 PropTypes.shape({ current: PropTypes.instanceOf(Element) }),63 ])64 : PropTypes.func,65 className: PropTypes.string,66 id: PropTypes.string.isRequired,67 isRequired: PropTypes.bool,68 label: PropTypes.string.isRequired,69 name: PropTypes.string.isRequired,70 onChange: PropTypes.func,71 placeholder: PropTypes.string.isRequired,72 step: PropTypes.string,73 type: PropTypes.string.isRequired,74 value: PropTypes.string,75 };76 77 export { TextInputField as default };
src/components/InputField.module.scss — click to expand code.
1 @import '../styles/styles.scss';2 3 .container {4 display: flex;5 flex-direction: column;6 padding-bottom: $spacing-4;7 align-items: center;8 }9 10 .label-field-container {11 display: flex;12 justify-content: space-between;13 align-items: center;14 width: 100%;15 }16 17 .field {18 background-color: $color-theme-3;19 border: $spacing-px-2 solid $color-theme-4;20 box-shadow: $spacing-0 $spacing-0 $spacing-1 $spacing-021 adjust-color($color: $color-theme-3, $alpha: 0.2);22 border-radius: $spacing-1;23 color: $color-theme-4;24 margin-left: auto;25 padding: $spacing-1 $spacing-2;26 }27 28 label {29 padding-right: $spacing-4;30 }31 32 input {33 width: 6rem;34 }35 36 .error-text {37 padding-top: $spacing-1;38 color: $color-danger;39 width: 100%;40 }41 42 @media screen and (max-width: $desktop-breakpoint) {43 .container {44 display: flex;45 flex-wrap: wrap;46 }47 }
As before, drop a comment or get in touch if something here could do with more explaining.
💯 Try it Out #
Please enable JavaScript to watch the video 📼
Everything should be working now. You can test the function locally, making
sure it builds, by running the cargo build command
from the project's root directory. As normal for Gatsby apps, you can test the client
build running npm run build then gatsby server. The easiest way to test the full functionality is to commit the repo and
set it up as a site on Netlify. When you do this, don't forget to add the
environment variables, otherwise the Gatsby part won't build. We run through how to launch a new site on Netlify in the post on building SvelteKit sites
on Netlify. The Netlify console part of the process is exactly the same for Gatsby
sites.
🙌🏽 What Do You Think? #
In this post, we learned:
- how to create a Gatsby site which uses serverless Rust;
- setting up your project to compile Netlify functions; and
- how to create an accessibility tool for checking contrast ratios for theme colours.
You can see the full code for this Use Serverless Rust with Netlify Functions project on the Rodney Lab GitHub repo .
The next (extension) step is to create some serverless Rust with Netlify functions in some of your side projects. Keen to hear what you do (as always)! Is there something from this post you can leverage for a side project or even client project?
I hope so! Let me know if there is anything in the post that I can improve on, for anyone else creating this project. You can leave a comment below, @ me on Twitter or try one of the other contact methods listed below.
🙏🏽 Gatsby Functions on Netlify: Feedback #
As I say, I hope you enjoyed following along and creating this project as well as learned something new. I also hope you will use this code in your own projects. I would love to hear what you are using serverless Rust for. Finally, be sure to let me know ideas for other posts you would like to see. Read on to find ways to get in touch, further below. If you have found this post useful, even though you can only afford even a tiny contribution, please consider supporting me through Buy me a Coffee.
Finally, feel free to share the post on your social media accounts for all your followers who will find it useful. As well as leaving a comment below, you can get in touch via @askRodney on Twitter and also askRodney on Telegram . Also, see further ways to get in touch with Rodney Lab. I post regularly on SvelteKit as well as Gatsby JS among other topics. Also, subscribe to the newsletter to keep up-to-date with our latest projects.