


🛸 Svelte CSS Image Slider: What is CSS :hover? #
First things first, what is a Svelte CSS Image Slider? The slider part is
just an image gallery with a strip of thumbnails. Click a thumbnail, and you
see a large preview of the image you selected. The hover part is making use
of a some future CSS

We use some code by Jhey Thompkins here to produce that same effect when we hover over an image preview. Jhey added
sprinkles; using the future CSS :has selector
also to make the thumbnails either side of the focussed one shift and grow, albeit
not as much. Using just CSS to do this makes the transitions look more smooth
and natural than using JavaScript. The only drawback is that :has is not supported in Firefox at the time of writing (although Chrome and Safari
do support it). Despite this, we can still grow and shift the focussed image in
Firefox.
🏓 Svelte CSS Image Slider: What is a Bouncing Slider? #
Please enable JavaScript to watch the video 📼
The overscroll bouncing slider, is a little bonus for mobile device users. The hover effect doesn’t look great on smaller screens. For that reason, we replace it with a slider. So mobile visitors don’t miss out on the future CSS magic, we add the bounce effect to the scroller. This is similar to an effect you might see on an iPhone, if you try to scroll past the start or end. The scroll bounces back to the first or last image. We use some code Adam Argyle demoed at the CSS Day conference to get this effect, again only with CSS for a natural feel across devices.
🧱 Svelte CSS Image Slider: What are we Building? #

We will build the CSS image slider we just described with a few extras. A follower asked me to write a tutorial on creating a node SvelteKit app which we can run on Ubuntu or another Linux distribution. Taking that into account, I thought this would be a great opportunity to be able to use the Sharp image processing package on the server. Sharp requires a NodeJS environment to run, so is not well-suited to serverless deploys. For speed across all devices, we want to serve responsive image sets. It can be painful to produce the inputs manually as static assets for all devices.
Sharp comes to the rescue here. We run it on a Svelte server endpoint which resizes images to the required size on the fly. We will see, later, that we can add a public cache directive, so Cloudflare will be able to cache the generated images for us. This helps serve images efficiently, without creating static assets in all the various formats and sizes.
You can code along or check open the site in StackBlitz to have a play (GitHub repo link further down).
⚙️ Following Along? Get Started Here… #
Spin up a fresh SvelteKit app:
pnpm dlx sv create svelte-css-image-slider && cd $_
If this is your first time using SvelteKit, learn how to create a Svelte app.
Then, install these packages:
pnpm add -D @fontsource/figtree @sveltejs/adapter-node @types/postcss-preset-env autoprefixer postcss-env-function postcss-load-config postcss-preset-envpnpm add --save-peer postcsspnpm add sharp
Be sure to install sharp in dependencies and not
serverDependencies. See this GitHub issue for explanation of why server dependencies should not be added
as devDependencies when you use the Node adapter.
Svelte CSS Image Slider: Future CSS Setup #
To use some future CSS, we can set up PostCSS
postcss.config.cjs — click to expand code.
const autoprefixer = require('autoprefixer');const postcssPresetEnv = require('postcss-preset-env'); const config = { plugins: [ autoprefixer(), postcssPresetEnv({ stage: 3, features: { 'nesting-rules': true, 'custom-media-queries': true, 'media-query-ranges': true } }) ]}; module.exports = config;
Then, update the Svelte Config file (svelte.config.js):
svelte.config.js — click to expand code.
import adapter from '@sveltejs/adapter-node';import preprocess from 'svelte-preprocess';import cspDirectives from './csp-directives.mjs'; /** @type {import('@sveltejs/kit').Config} */const config = { // Consult https://github.com/sveltejs/svelte-preprocess // for more information about preprocessors preprocess: preprocess({ postcss: true }), kit: { adapter: adapter({ precompress: true }), csp: { mode: 'hash', directives: cspDirectives } }}; export default config;
Images Setup #
Then, add create a src/lib/data folder and add the
JSON image metadata below to a images.json file
in the new directory.
src/lib/data/images.json — click to expand code.
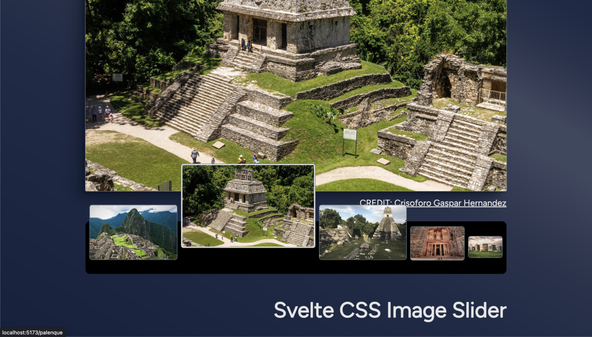
{ "machu-picchu": { "title": "Machu Picchu, Perú", "alt": "Intricately carved Inca ruins at Machu Picchu balanced atop a mountain top backed by Waynu Picchu and other Andes mountain peaks", "source": "https://unsplash.com/photos/rFESpq5MMTg", "credit": { "name": "Eddie Kiszka", "profile": "https://unsplash.com/@eddiekiszka" } }, "palenque": { "title": "Palenque, México", "alt": "Palenque Mayan temple dwarfs visitors amid green grass strong Méxican sunlight", "source": "https://unsplash.com/photos/eLqm1qHJJgI", "credit": { "name": "Crisoforo Gaspar Hernandez", "profile": "https://unsplash.com/@mitogh" } }, "peten": { "title": "Petén, Guatemala", "alt": "Imense Mayan ruins with steep steps to left and behind border an open area with rustic buildings with straw roofs", "source": "https://unsplash.com/photos/eoZTnFtusDs", "credit": { "name": "Jimmy Baum", "profile": "https://unsplash.com/@amongthestones" } }, "petra": { "title": "Petra, Jordan", "alt": "Huge edifice carved into rock face towers above two people dressed in medieval armour as dusk approaches", "source": "https://unsplash.com/photos/eoZTnFtusDs", "credit": { "name": "Brian Kairuz", "profile": "https://unsplash.com/@briankairuz" } }, "stonehenge": { "title": "StoneHenge, United Kingdom", "alt": "Desserted Stonehenge amid, with lush, green grass in the foreground and bright, albeit overcast skies", "source": "https://unsplash.com/photos/oQ9pECond48", "credit": { "name": "K. Mitch Hodge", "profile": "https://unsplash.com/@kmitchhodge" } }}
You can get the images themselves from the GitHub repo. Save them to the paths
shown below (within a new src/assets folder). Here
are the links:
-
src/assets/machu-picchu.jpg, -
src/assets/palenque.jpg, -
src/assets/peten.jpg, -
src/assets/petra.jpg, -
src/assets/stonehenge.
Images are all from unsplash. See JSON file above for credits.
🍽 Layout: Self‑hosting new Figtree Font #
We’re trying out the new, free Figtree Google sans serif font by Erik Kennedy here, which we self-host. Self-hosting helps with optimization, resulting in one less origin for visitor browsers to connect to. This brings HTTP/2 multiplexing potential benefits too.
Besides the new font, there is nothing extraordinary in the layout file. The
site will have a page for each image with a URL like https://example.com/machu-picchu. For that reason, we create a src/routes/[slug] dynamic route folder. Create the +layout.svelte file in this new folder with the following content:
src/routes/[slug]/+layout.svelte — click to expand code.
<script lang="ts"> import '@fontsource/figtree';</script> <slot /> <style lang="postcss"> :global(*, *:after, *:before) { box-sizing: border-box; } :global(body) { margin: var(--spacing-0); min-height: 100vh; font-family: var(--font-family-body); background: var(--colour-brand); /* CREDIT: https://www.joshwcomeau.com/gradient-generator/ */ background-image: linear-gradient( 30deg, hsl(221deg 51% 16%) 0%, hsl(222deg 39% 20%) 38%, hsl(223deg 31% 23%) 50%, hsl(223deg 25% 27%) 58%, hsl(222deg 21% 31%) 64%, hsl(222deg 21% 31%) 69%, hsl(223deg 25% 27%) 73%, hsl(223deg 31% 23%) 78%, hsl(222deg 39% 20%) 84%, hsl(221deg 51% 16%) 100% ); } :root { --lerp-0: 1; --lerp-1: 0.5625; --lerp-2: 0.25; --lerp-3: 0.0625; --lerp-4: 0; --spacing-px: 1px; --spacing-px-2: 2px; --spacing-0: 0; --spacing-1: 0.25rem; --spacing-2: 0.5rem; --spacing-4: 1rem; --spacing-5: 1.25rem; --spacing-6: 1.5rem; --spacing-12: 3rem; --spacing-24: 6rem; --spacing-28: 7rem; --spacing-36: 9rem; --spacing-outer: var(--spacing-4); --max-width-container-sm: 42rem; /* 672px */ --max-width-container-md: 48rem; /* 768px */ --max-width-container-lg: 64rem; /* 1024px */ --max-width-container-xl: 80rem; /* 1280px */ --max-width-full: 100%; --_max-width-wrapper: var(--max-width-container-sm); @media (width > 64rem) { --_max-width-wrapper: var(--max-width-container-md); } @media (width > 80rem) { --_max-width-wrapper: var(--max-width-container-lg); } /* font sizes */ --font-size-3: 1.266rem; --font-size-4: 1.424rem; --font-size-5: 2.441rem; /* font weights */ --font-weight-bold: bold; /* font families */ --font-family-body: Figtree; --colour-dark: hsl(0deg 0% 0%); /* black */ --colour-light: hsl(0deg 0% 90%); /* mercury */ --colour-theme: hsl(221deg 51% 16%); /* big stone */ --colour-alt: hsl(30deg 1% 47%); /* concord */ --colour-brand: hsl(180deg 8% 45%); /* sirocco */ /* CREDIT: https://www.joshwcomeau.com/shadow-palette/*/ --shadow-color: 224deg 67% 6%; --shadow-elevation-medium: -1px 1px 1.6px hsl(var(--shadow-color) / 0.36), -3.3px 3.3px 5.3px -0.8px hsl(var(--shadow-color) / 0.36), -8.2px 8.2px 13px -1.7px hsl(var(--shadow-color) / 0.36), -20px 20px 31.8px -2.5px hsl(var(--shadow-color) / 0.36); }</style>
📸 Image Generation Server Endpoint #
Let’s take a look server side next. We mentioned briefly earlier that we
will generate responsive images on the fly. We will see, later, we can speed
up page load but serving images appropriate to the user device. Although this
is a fantastic performance optimization, it can mean generating quite a few
resized images of different sizes for each actual image we want to include.
Consider the fact that we want to support devices with 340px wide screens, as well as show images up to 1024px wide on desktops with larger displays. On top, to support Retina and other high
density displays, we also make images available in double width too as well as in
WebP and AVIF
Cloudflare Early Hints #
To speed things up, we will include a rel=preload in the page header and include a public caching header. This should encourage
Cloudflare to use 103 Early hints as well as cache the images. Although things will be slow for the first visitor
as images get generated, subsequent visitors will the cached versions. As a further
optimization, we will set the cache header to immutable. This instruction tells browsers and caching servers that we never expect
to update the images. How, then, do we update them? That’s where the hash part of the file path comes in! If we change the file, we can expect the hash
to change too, and the immutable directive on the
old path will not matter.
src/routes/assets/[hash]/[filename]/server.ts — click to expand code.
import { error } from '@sveltejs/kit';import { createReadStream, statSync } from 'node:fs';import type { Readable } from 'node:stream';import { PassThrough } from 'node:stream';import { join } from 'path';import sharp from 'sharp';import type { RequestHandler } from './$types'; async function metadata( source: string): Promise<{ format?: string; width?: number; error?: string }> { try { const image = sharp(source); const { format, width } = await image.metadata(); if (format) { return { format, width }; } } catch (error: unknown) { console.error(`Error reading image metadata: ${source}: ${error}`); } return { error: `Error reading image metadata: ${source}` };} function resize(imageStream: Readable, width: number, format: string): ReturnType<RequestHandler> { let sharpTransforms; switch (format) { case 'jpeg': sharpTransforms = sharp().resize(width).jpeg({ mozjpeg: true }); break; case 'avif': sharpTransforms = sharp().resize(width).avif({ quality: 80 }); break; case 'webp': sharpTransforms = sharp().resize(width).webp({ quality: 80 }); break; default: sharpTransforms = sharp(); } const passthroughStream = new PassThrough(); imageStream.pipe(sharpTransforms).pipe(passthroughStream); // @ts-expect-error respond with passthrough stream return new Response(passthroughStream as unknown);} // Based on: https://github.com/remix-run/examples/blob/main/image-resize/app/routes/assets/resize/%24.tsexport const GET: RequestHandler = async function get({ params, url, setHeaders }) { try { const { filename } = params; const srcPath = join('src/assets', filename); const fileStat = statSync(srcPath); if (!fileStat) { throw error(404, 'Not found'); } const metadataPromise = metadata(srcPath); const readStream = createReadStream(srcPath); const { format, width } = await metadataPromise; if (!format || !readStream || !width) { throw error(404, 'Not found'); } const { searchParams } = url; const outputWidthString = searchParams.get('w'); const outputWidth = outputWidthString ? Math.min(parseInt(outputWidthString, 10), width) : width; const outputFormat = searchParams.get('format') ?? format; setHeaders({ 'Content-Type': `image/${outputFormat}`, 'Content-Disposition': `filename= ${filename.split('.')[0]}.${outputFormat}`, 'Cache-Control': 'public, max-age=31536000, immutable' }); return resize(readStream, outputWidth, outputFormat); } catch (err: unknown) { const httpError = err as { status: number; message: string }; if (httpError.status && httpError.message) { throw error(httpError.status, httpError.message); } const { pathname } = url; const message = `Error in load function for path "${pathname}": ${err as string}`; console.error(message); throw error(500, message); }};
In brief, we check for resize and format query strings in the request URL, so we can respond with the right next-gen format
and size. The Cache-Control header is most important
here. This is where we request Cloudflare cache for a very long time and not to
check for updated images. Finally, Sharp does the transformation magic, and we use
streams to optimize serving the images.
🍸 Svelte CSS Image Slider Server Code #
Here, we use Vite JSON import to pull in image meta from a JSON file within the project. We return hrefs for all the images (thumbnails and large preview) here. We include the
hash mentioned earlier in these values. Finally, we generate a low quality
Base64 placeholder for each image. We will set these as the background image,
so the browser shows them while waiting for the full resolution images to
load. This is another speed optimization.
src/routes/[slug]/+page.server.ts — click to expand code.
1 import type { PageServerLoad } from './$types';2 import imageMeta from '$lib/data/images.json';3 import { join } from 'node:path';4 import { error } from '@sveltejs/kit';5 import { base64, hash } from '$lib/utilities/image.server';6 7 export const load: PageServerLoad = async function load({ params }) {8 try {9 const { slug: imageSlug } = params;10 11 const imagesFiles = import.meta.glob('../../assets/*.jpg');12 const images = await Promise.all(13 Object.keys(imagesFiles).map(async (path) => {14 const src = path.split('/').at(-1);15 if (!src) throw error(404, 'Not found');16 17 const [slug] = src?.split('.') ?? '';18 const {19 alt,20 credit,21 title22 }: { alt: string; credit: { name: string; profile: string }; title: string } =23 // @ts-expect-error use slug as index on JSON object24 imageMeta[slug];25 const imageHash = hash(join('src/assets', src));26 const placeholder = await base64(join('src/assets', src), 10);27 return { alt, credit, placeholder, slug, src: `/assets/${imageHash}/${src}`, title };28 })29 );30 const image = images.find(({ slug }) => slug === imageSlug);31 if (!image) throw error(404, 'Not found');32 33 return {34 image,35 images36 };37 } catch (err: unknown) {38 const httpError = err as { status: number; message: string };39 if (httpError.message) {40 throw error(httpError.status ?? 500, httpError.message);41 }42 throw error(500, err as string);43 }44 };
Also, worth a mention is the use of Vite glob imports in line 11. This finds all *.jpg files in the assets folder. Using a glob import instead of naming the files makes
it easier to swap out the images (we still need to update the JSON meta file though).
Server Image Utility Functions #
We will need a couple of utility functions to generate the Base64 low quality placeholders and also image hashes. Although the MD5 hashing algorithm is no longer considered suitable for cryptographic purposes, it is fine to use it here; an adversary has nothing to gain from finding hash collisions for our images. Instead of using the full hash, we truncate it to just 10 characters, which should be sufficient for use in identifying changes in the images.
We use a Remix convention here in naming the server image utilities. While
with Remix the .server portion means the code can
only run on the server, as far as know, SvelteKit has no such guarantee and the
name is just to help us import the right files.
1 import crypto from 'node:crypto';2 import { readFileSync } from 'node:fs';3 import sharp from 'sharp';4 5 export async function base64(imageSource: string, width = 10): Promise<string> {6 const image = sharp(imageSource);7 const bufferPromise = image8 .resize(width, null)9 .jpeg({10 quality: 50,11 progressive: true,12 optimiseScans: true,13 chromaSubsampling: '4:2:0',14 trellisQuantisation: true,15 quantisationTable: 216 })17 .toBuffer({ resolveWithObject: false });18 const metadataPromise = image.metadata();19 20 const [buffer, { format }] = await Promise.all([bufferPromise, metadataPromise]);21 22 return `data:image/${format};base64,${buffer.toString('base64')}`;23 }24 25 export function hash(path: string): string {26 const fileBuffer = readFileSync(path);27 const hashSum = crypto.createHash('md5');28 hashSum.update(fileBuffer);29 return hashSum.digest('hex').slice(0, 10);30 }
We use sharp here to generate the Base64 placeholders and the node Crypto module for hashes .
🧑🏽 Image Page Frontend Code #
This is the frontend template code for our page. However, the interesting image optimizations and CSS are in the two component files we look at in the next two sections.
src/routes/[slug]/+page.svelte — click to expand code.
<script lang="ts"> import Image from '$lib/components/Image.svelte'; import Thumbnails from '$lib/components/Thumbnails.svelte'; import type { PageData } from './$types'; let { data }: { data: PageData } = $props(); let { image, images } = $derived(data); let currentSlug = $derived(image.slug);</script><svelte:head> <title>{image.title} | Svelte CSS Image Slider</title> <meta name="description" content="Svelte CSS image slider: how to create a CSS :hover preview image gallery with mobile bouncing overscroll using future CSS and SvelteKit." /></svelte:head> <main class="container"> <div class="wrapper"> <h1 class="heading">Svelte CSS Image Slider</h1> <section class="preview-container"> <Image {image} /> </section> <div class="thumbnails-wrapper"> <Thumbnails {currentSlug} {images} /> </div> </div></main> <style lang="postcss"> .container { display: grid; place-items: center; grid-template-columns: var(--max-width-full); min-height: 100vh; width: var(--max-width-full); padding-top: var(--spacing-12); } .wrapper { display: grid; grid-template-columns: var(--max-width-full); grid-template-areas: 'preview' 'thumbnails' 'heading'; grid-template-rows: auto auto auto; width: calc(var(--max-width-full) - var(--spacing-12)); padding: var(--spacing-6) var(--spacing-outer) var(--spacing-24); max-width: var(--max-width-full); } @media (width > 48rem) { .wrapper { padding: var(--spacing-6) auto var(--spacing-24); width: min(var(--max-width-full), var(--_max-width-wrapper)); } } .preview-container { grid-area: preview; aspect-ratio: 16 / 10; border-radius: var(--spacing-px-2); margin-bottom: var(--spacing-6); max-width: 100%; } .thumbnails-wrapper { grid-area: thumbnails; position: relative; min-height: var(--spacing-28); @media (width > 80rem) { min-height: var(--spacing-36); } } h1 { grid-area: heading; color: var(--colour-light); font-size: var(--font-size-3); font-weight: var(--font-weight-bold); text-align: right; width: var(--max-width-full); @media (width > 42rem) { font-size: var(--font-size-4); } @media (width > 64rem) { font-size: var(--font-size-5); } }</style>
🌄 Large Image Component #
This is the component for the large preview image. Possibly most important
here is setting image heights and widths in the HTML template code to reduce
Cumulative Layout Shift . On top, we set aspect-ratio in the CSS as well
as set height to auto.
We mention the image source set briefly before. Including this lets the
browser choose the most adequate image for the device. We decide on image
densities of 1 and 2, needed for Retina displays. Then, we have image widths of 280px, 334px, 672px, 768px, 1024px. These correspond to image sizes required for a small 360px wide screen, the iPhone XR (widest common mobile) and the desktop breakpoints.
We have utility functions to generate the sets, and the final code will look something
like this:
<picture> <source sizes="(max-width: 768px) 100vw, (max-width: 1024px) 672px, (max-width: 1280px) 768px, 1024px" srcset=" /assets/36a9348086/palenque.jpg?w=2048&format=avif 2048w, /assets/36a9348086/palenque.jpg?w=1536&format=avif 1536w, /assets/36a9348086/palenque.jpg?w=1344&format=avif 1344w, /assets/36a9348086/palenque.jpg?w=1024&format=avif 1024w, /assets/36a9348086/palenque.jpg?w=768&format=avif 768w, /assets/36a9348086/palenque.jpg?w=748&format=avif 748w, /assets/36a9348086/palenque.jpg?w=672&format=avif 672w, /assets/36a9348086/palenque.jpg?w=560&format=avif 560w, /assets/36a9348086/palenque.jpg?w=374&format=avif 374w, /assets/36a9348086/palenque.jpg?w=280&format=avif 280w " type="image/avif" width="1024" height="576" /> <source sizes="(max-width: 768px) 100vw, (max-width: 1024px) 672px, (max-width: 1280px) 768px, 1024px" srcset=" /assets/36a9348086/palenque.jpg?w=2048&format=webp 2048w, ...TRUNCATED... /assets/36a9348086/palenque.jpg?w=280&format=webp 280w" type="image/webp" width="1024" height="576" /> <source sizes="(max-width: 768px) 100vw, (max-width: 1024px) 672px, (max-width: 1280px) 768px, 1024px" srcset=" /assets/36a9348086/palenque.jpg?w=2048&format=jpeg 2048w, ...TRUNCATED... /assets/36a9348086/palenque.jpg?w=280&format=jpeg 280w" type="image/jpeg" width="1024" height="576" class="s-wHckl4XSACcy" /> <img class="preview s-wHckl4XSACcy" alt="Palenque Mayan temple dwarfs visitors amid green grass strong Méxican sunlight" src="/assets/36a9348086/palenque.jpg?w=1024" width="1024" height="576" fetchpriority="high" style="background: url("data:image/jpeg;base64,/9j/...TRUNCATED") 0% 0% / cover;"></picture>
Image Component Code #
Remember, the query strings in the image URLs tell our server endpoint what size and format to serve. We opt for graceful degradation in the source sets, so start (optimistically) with AVIF, the newest and smallest next-gen format. If the browser does not support this, then we fall back to WebP and finally JPEG. For each set, the sizes attribute helps the browser decide which image to download while it is still working out the page layout. Although we could possibly cut down on the number of images here, we make the point that auto generation is a massive convenience.
Anyway, here is the component code (add it to src/lib/components/Image.svelte):
src/lib/components/Image.svelte — click to expand code.
1 <script lang="ts">2 import { getSrcset } from '$lib/utilities/image';3 import '@fontsource/figtree';4 5 let {6 image,7 }: {8 image: {9 alt: string;10 credit: { name: string; profile: string };11 title: string;12 placeholder: string;13 slug: string;14 src: string;15 };16 } = $props();17 18 let {19 alt,20 credit: { name: artist, profile },21 src22 } = $derived(image);23 24 const densities = [1.0, 2.0];25 const SIZES = [280, 374, 672, 768, 1024];26 const avifSrcset = $derived(27 getSrcset({28 densities,29 format: 'avif',30 sizes: SIZES,31 src,32 }),33 );34 const webpSrcset = $derived(35 getSrcset({36 densities,37 format: 'webp',38 sizes: SIZES,39 src,40 }),41 );42 const jpgSrcset = $derived(43 getSrcset({44 densities,45 format: 'jpeg',46 sizes: SIZES,47 src,48 }),49 );50 const sizes =51 '(max-width: 768px) 100vw, (max-width: 1024px) 672px, (max-width: 1280px) 768px, 1024px';52 </script>53 54 <svelte:head>55 <link56 rel="preload"57 as="image"58 href={src}59 imagesrcset={avifSrcset}60 imagesizes={sizes}61 fetchpriority="high"62 />63 </svelte:head>64 65 <figure>66 <picture>67 <source {sizes} srcset={avifSrcset} type="image/avif" width={1024} height={576} />68 <source {sizes} srcset={webpSrcset} type="image/webp" width={1024} height={576} />69 <source {sizes} srcset={jpgSrcset} type="image/jpeg" width={1024} height={576} />70 <img71 style:background="url('{image.placeholder}')"72 style:background-size="cover"73 class="preview"74 {alt}75 src={`${src}?w=1024`}76 width={1024}77 height={576}78 fetchpriority="high"79 />80 </picture>81 <figcaption>CREDIT: <a href={profile}>{artist}</a></figcaption>82 </figure>83 84 <style lang="postcss">85 .preview {86 border-radius: var(--spacing-px-2);87 box-shadow: var(--shadow-elevation-medium);88 outline: var(--spacing-px) solid var(--colour-brand);89 max-width: 100%;90 aspect-ratio: 16 / 10;91 height: auto;92 }93 94 figure {95 margin: var(--spacing-0);96 }97 98 img {99 background-position: center center;100 background-repeat: no-repeat;101 }102 103 figcaption {104 width: var(--max-width-full);105 text-align: right;106 margin-top: var(--spacing-2);107 color: var(--colour-light);108 }109 110 figcaption a {111 color: inherit;112 }113 </style>
As a final note here, the rel=preload we include
in the HTML head is a way of preloading image source sets in Chromium . fetchpriority is a newer priority hint, again
supported by Chromium . This replaces the older importance attribute.
Finally, including the rel=preload link should instruct
Cloudflare to cache the images using the Early Hints API. As well as using Cloudflare
as a CDN
Svelte CSS Image Slider: Client Image Utility Functions #
We have a few utility functions to help generate the image sets. Since the
client code needs these, they go in src/lib/utilities/image.ts and not the .server variant we created earlier.
src/lib/utilities/image.ts — click to expand code.
export interface ImageSrcInput { format: string; src: string; width: number;} interface ImageWidthsInput { densities: number[]; sizes: number[];} type ImageSrcsetInput = ImageWidthsInput & Omit<ImageSrcInput, 'width'>; function getSortedWidths({ densities, sizes }: ImageWidthsInput): number[] { const widths = new Set<number>(); sizes.forEach((size) => { densities.forEach((density) => widths.add(Math.round(size * density))); }); return [...widths].sort((a, b) => b - a);} export function getSrcset({ densities, sizes, src, format }: ImageSrcsetInput): string { const sortedWidths = getSortedWidths({ densities, sizes }); return sortedWidths .map((element) => `${src}?w=${element}&format=${format} ${element}w`) .join(',');}
👍🏽 Thumbnails Component: Svelte Code #
This is where the exciting CSS is. We dissect it in the following sections.
The markup is not too different to the main image. You might notice we include
stub bookend <div aria-hidden="true" class="overscroller" />. These are used in Adam Argyle’s bouncy scroll, We’ll come to
them later!
Create src/lib/components/Thumbnails.svelte with
the following code:
1 <script lang="ts">2 import scrollCurrentIntoView from '$lib/shared/actions/scrollCurrentIntoView';3 import { getSrcset } from '$lib/utilities/image';4 5 let {6 images,7 currentSlug,8 }: {9 images: {10 alt: string;11 title: string;12 placeholder: string;13 slug: string;14 src: string;15 }[];16 currentSlug: string;17 } = $props();18 19 const densities = [1.0, 2.0];20 const THUMBNAIL_SIZES = [144, 307, 542];21 const thumbnailSizes =22 '(max-width: 768px) 40vw, (max-width: 1024px) 287px, (max-width: 1280px) 400px, 542px';23 </script>24 25 <nav class="thumbnails">26 <div aria-hidden="true" class="overscroller"></div>27 {#each images as { alt, placeholder, src, slug }}28 {@const avifThumbnailSrcset = getSrcset({29 densities,30 format: 'avif',31 sizes: THUMBNAIL_SIZES,32 src33 })}34 {@const webpThumbnailSrcset = getSrcset({35 densities,36 format: 'webp',37 sizes: THUMBNAIL_SIZES,38 src39 })}40 {@const jpgThumbnailSrcset = getSrcset({41 densities,42 format: 'jpeg',43 sizes: THUMBNAIL_SIZES,44 src45 })}46 <a47 use:scrollCurrentIntoView={slug === currentSlug}48 data-sveltekit-prefetch49 data-sveltekit-reload50 aria-current={slug === currentSlug}51 href={`/${slug}`}52 class="thumbnail"53 >54 <picture>55 <source sizes={thumbnailSizes} srcset={avifThumbnailSrcset} type="image/avif" width={170} />56 <source sizes={thumbnailSizes} srcset={webpThumbnailSrcset} type="image/webp" width={170} />57 <source sizes={thumbnailSizes} srcset={jpgThumbnailSrcset} type="image/jpeg" width={170} />58 <img59 style:background="url('{placeholder}')"60 style:background-size="cover"61 {alt}62 class="thumbnail-item"63 loading="lazy"64 src={`${src}?w=542}`}65 width={542}66 height={305}67 /></picture68 >69 </a>70 {/each}71 <div aria-hidden="true" class="overscroller"></div>72 </nav>
🎬 Scroll into View Action #
This snippet uses Svelte actions — a more convenient Sveltey way of adding a scroll into view query
selector on the active image. Create a src/lib/actions folder. In this new directory, create scrollCurrentIntoView.ts with this code:
src/lib/shared/actions/scrollCurrentIntoView.ts — click to expand code.
function scrollCurrentIntoView(node: HTMLAnchorElement, current: boolean) { if (current) { const prefersReducedMotion = window.matchMedia('(prefers-reduced-motion: reduce)').matches; node.scrollIntoView({ behavior: prefersReducedMotion ? 'auto' : 'smooth', inline: 'center', block: 'end' }); }} export default scrollCurrentIntoView;
💅🏽 Thumbnails Component: CSS #
Here’s the CSS code in full, in case you are following along. We will
just pick out the most interesting bits to talk about in the rest of this
section. You can paste the code at the end of src/lib/components/Thumbnails.svelte
src/lib/components/Thumbnails.svelte — click to expand code.
69 <style lang="postcss">70 /* Based on Jhey Thompkins CodePen: https://codepen.io/jh3y/pen/mdxggmO 71 * and Adam Argyle git repo: https://github.com/argyleink/2022-css-day_oh-snap72 */73 74 .thumbnails {75 display: flex;76 overflow-x: auto;77 border-radius: var(--spacing-2);78 gap: var(--spacing-4);79 background: var(--colour-dark);80 overscroll-behavior-x: contain;81 scroll-snap-type: x mandatory;82 padding: var(--spacing-4);83 scroll-padding: var(--spacing-4);84 }85 86 .thumbnails::-webkit-scrollbar {87 background: transparent;88 }89 90 .thumbnails::-webkit-scrollbar-thumb {91 background: var(--colour-alt);92 border-radius: var(--spacing-2);93 }94 95 .thumbnails::-webkit-scrollbar-track {96 background: var(--colour-dark);97 border-radius: var(--spacing-2);98 }99 100 .thumbnail {101 @media (width > 48rem) {102 outline: none;103 height: auto;104 display: grid;105 place-items: center;106 transition: flex 0.2s;107 flex: calc(0.2 + (var(--lerp, 0) * 0.8));108 position: relative;109 }110 }111 112 .thumbnails > :not(.overscroller) {113 scroll-snap-align: center;114 scroll-snap-stop: always;115 }116 117 .thumbnail:nth-child(2) {118 scroll-snap-align: start;119 }120 121 .thumbnail:nth-last-child(2) {122 scroll-snap-align: end;123 }124 125 .overscroller {126 display: block;127 inline-size: 15vw;128 flex: 0 0 auto;129 }130 131 .thumbnail-item {132 width: 40vw;133 height: auto;134 aspect-ratio: 16 / 10;135 border-radius: var(--spacing-1);136 137 @media (width > 48rem) {138 display: inline-block;139 border-style: none;140 width: 125px;141 142 transition: transform 0.2s;143 transform-origin: 50% 100%;144 position: relative;145 transform: translateY(calc(var(--lerp) * -50%));146 }147 148 @media (width > 64rem) {149 width: 144px;150 }151 152 @media (width > 80rem) {153 width: 196px;154 }155 }156 157 .thumbnail-item:hover {158 border: var(--spacing-px-2) solid var(--colour-light);159 }160 161 @media (width > 48rem) {162 .overscroller {163 display: none;164 }165 166 .thumbnails {167 position: absolute;168 top: 0;169 left: 0;170 overflow-x: unset;171 display: flex;172 align-items: center;173 justify-content: center;174 gap: var(--spacing-2);175 padding: var(--spacing-2);176 }177 }178 179 .thumbnails:hover,180 .thumbnails:focus-within {181 @media (width > 48rem) {182 --show: 1;183 height: var(--spacing-24);184 }185 }186 187 [aria-current='true'] .thumbnail-item {188 outline: var(--spacing-px-2) solid var(--colour-brand);189 }190 191 @media (width > 48rem) {192 .thumbnail .thumbnail-item {193 transition: outline 0.2s;194 outline: var(--colour-brand) var(--spacing-px) solid;195 }196 197 :is(.thumbnails:hover, .thumbnails:focus-within) .thumbnail-item {198 width: var(--max-width-full);199 }200 201 :is(.thumbnail:hover, .thumbnail:focus-visible) {202 --lerp: var(--lerp-0);203 z-index: 5;204 }205 .thumbnail:has(+ :is(.thumbnail:hover, .thumbnail:focus-visible)),206 :is(.thumbnail:hover, .thumbnail:focus-visible) + .thumbnail {207 --lerp: var(--lerp-1);208 z-index: 4;209 }210 .thumbnail:has(+ .thumbnail + :is(.thumbnail:hover, .thumbnail:focus-visible)),211 :is(.thumbnail:hover, .thumbnail:focus-visible) + .thumbnail + .thumbnail {212 --lerp: var(--lerp-2);213 z-index: 3;214 }215 .thumbnail:has(+ .thumbnail + .thumbnail + :is(.thumbnail:hover, .thumbnail:focus-visible)),216 :is(.thumbnail:hover, .thumbnail:focus-visible) + .thumbnail + .thumbnail + .thumbnail {217 --lerp: var(--lerp-3);218 z-index: 2;219 }220 .thumbnail:has(+ .thumbnail221 + .thumbnail222 + .thumbnail223 + :is(.thumbnail:hover, .thumbnail:focus-visible)),224 :is(.thumbnail:hover, .thumbnail:focus-visible)225 + .thumbnail226 + .thumbnail227 + .thumbnail228 + .thumbnail {229 --lerp: var(--lerp-4);230 z-index: 1;231 }232 }233 234 a {235 color: var(--colour-alt);236 }237 238 picture {239 display: flex;240 }241 242 img {243 background-position: center center;244 background-repeat: no-repeat;245 }246 </style>
We won’t go into detail on the :hover steps
effect here. Basically, it is set using lerp CSS
custom properties. These are defined in the CSS in src/routes/[slug]/+layout. Lerp stands for linear interpolation and is a function which helps smooth
motion in video games. Here Jhey uses it to for a natural , physical scaling on the focussed thumbnail and adjacent ones.
The main impact is on the flex-grow property , which fixes the relative sizes of the .thumbnails elements. Tweak the flexflex syntax: none | [ <'flex-grow'> <'flex-shrink'>? || <'flex-basis'> ]flex property is a recommended shorthand for flex-grow) in line 107 as well as the --lerp custom properties
in src/routes/[slug]/+layout.css to get a feel for how it impacts the
elements.
Bouncy slider overscroll #
Adam Argyle gave a marvellous talk at CSS day on scroll sliders . I hadn’t appreciated just how customizable they are. This is the most relevant CSS code for the effect:
.thumbnails { overflow-x: auto; overscroll-behavior-x: contain; scroll-snap-type: x mandatory; scroll-padding: var(--spacing-4); } .thumbnails > :not(.overscroller) { scroll-snap-align: center; scroll-snap-stop: always; } .thumbnail:nth-child(2) { scroll-snap-align: start; } .thumbnail:nth-last-child(2) { scroll-snap-align: end; } .overscroller { display: block; inline-size: 15vw; flex: 0 0 auto; }
-
overscroll-behavior-x: contain— this stops the whole window moving when you hit the end of the scroller, -
scroll-snap-type: x mandatory— use this to snap scrolling at certain points (another nice alternative isproximitywhich is less strict about things), -
scroll-padding— adds padding to the scroll element, -
scroll-snap-align— set on a thumbnail, controls whether the thumbnail is centre aligned or edge aligned whenscroll-snap-typeon scroller ismandatoryorproximity. We use centre here, but set it to start and end for first and last elements, -
scroll-snap-stop— fantastic for an image slider, stops you scrolling through dozens of thumbnails at once — make the viewer savour those thumbnails 😅.
The .overscroller class is an Adam Argyle trick.
Remember we added bookend stub elements, to the slider? Those extend the slider
slightly and the user exposes them when they overscroll. However, we do not set
scroll-snap-align on them, so when they do get exposed,
the browser automatically snaps to the next snappable element, which is
the second or second-last element (or the first or last real thumbnail). The spring
is provided natively by the browser. Is that not neat? To allow for the stub elements,
we set scroll-snap-align to start and end for the second and penultimate element
rather than first and last ones.
🗳 Poll #
🚧 Redirection #
A final detail, we redirect from the ‘/’ route to the first image using a server layout endpoint in src/routes/+layout.server.ts:
src/routes/+layout.server.ts — click to expand code.
import { error, redirect } from '@sveltejs/kit';import type { LayoutServerLoad } from './$types'; export const load: LayoutServerLoad = async function load({ url }) { try { const { pathname } = url; const imagesFiles = import.meta.glob('../assets/*.jpg'); const path = Object.keys(imagesFiles)[0]; const src = path.split('/').at(-1); if (!src) throw error(404, 'Not found'); const [slug] = src?.split('.') ?? ''; if (pathname === '/') throw redirect(301, slug); return {}; } catch (err: unknown) { // rethrow a redirect error const redirectError = err as { status: number; location: string }; if (redirectError.status === 301) { throw redirect(301, redirectError.location); } // process any other type of error console.error(err as string); throw error(500, err as string); }};
🙌🏽 Svelte CSS Image Slider: Wrapping Up #
In this post, we saw how you can use sharp and future CSS to create a performant and feature-packed Svelte CSS image slider. In particular, we saw:
- some CSS code for :hover thumbnail effects,
- how to add bouncy overscroll sliders,
- quite a few optimizations for serving images.
Please clone the site from the Rodney Lab GitHub repo or open up the site on StackBlitz to try it out if you haven’t coded along. Hope you have found this post on creating a Svelte CSS image Slider useful! In a follow-up post, we will see how to deploy our node SvelteKit app to cloud hosting in a Linux box. We shall maintain the focus on performance as well as consider security there. I hope you will join me, and am also keen to hear what else you are doing with Svelte and ideas for future projects. Also let me know about any possible improvements to the content above.
🏁 Svelte CSS Image Slider: Summary #
Can you use future CSS with SvelteKit? #
- Yes, using PostCSS, you can start adding future CSS to your SvelteKit apps. We saw, once you install the PostCSS plugins, you need to add a `postcss.config.cjs` file to the project root folder. Then set `postcss: true` in your svelte.config.js config.preprocess options object. Finally, set the `lang=postcss` on your style tags in Svelte template files. That’s all you need!
Do you have to use JavaScript to make an image scroller look good? #
- JavaScript offers many animation libraries, though for some effects they can look unnatural on certain devices. CSS often offers a performant and well-supported alternative which can look much more natural. Although it is probably possible to do more using JavaScript, it is a nice idea to try to use CSS where it can work. We saw adding an overscroll effect and an operating system dock :hover effect are both achievable with just CSS.
How can you create a mobile bouncy overscroll effect in CSS? #
- We have seen Adam Argyle’s trick is a fantastic way to create a performant, widely supported CSS overscroll effect. The effect we are talking about lets the user scroll past the final elements, and pings back once they let go. This is common on iOS devices, but we can make it available across the board using CSS. First, we add extra stub elements either end. We can size them and using the `inline-width` property and style them to be transparent, to fit the container. Then, we set `scroll-snap-type` to mandatory on the scroller element. Finally, we set `scroll-snap-align`, to `start`, for example on all elements except the two stub ones. Now, when the user overscrolls, the scroller bounces to the first or last element.
🙏🏽 Svelte CSS Image Slider: Feedback #
If you have found this post useful, see links below for further related content on this site. I do hope you learned one new thing from the video. Let me know if there are any ways I can improve on it. I hope you will use the code or starter in your own projects. Be sure to share your work on Twitter, giving me a mention, so I can see what you did. Finally, be sure to let me know ideas for other short videos you would like to see. Read on to find ways to get in touch, further below. If you have found this post useful, even though you can only afford even a tiny contribution, please consider supporting me through Buy me a Coffee.


Just dropped the 1st part of a 2-part post on creating a node image slider with ♥️ SvelteKit.
— Rodney (@askRodney) October 12, 2022
We use sharp to generate resized responsive images in next-gen formats and cache them in the CDN to make the page 🔥 fast.
Hope you find it useful.
#askRodneyhttps://t.co/n4dsR15y3i
Finally, feel free to share the post on your social media accounts for all your followers who will find it useful. As well as leaving a comment below, you can get in touch via @askRodney on Twitter and also askRodney on Telegram . Also, see further ways to get in touch with Rodney Lab. I post regularly on SvelteKit as well as Search Engine Optimization among other topics. Also, subscribe to the newsletter to keep up-to-date with our latest projects.