This Gatsby post was written for Gatsby 3 and is no longer maintained. If you would like to try out SvelteKit or Astro, check out the maintained posts which are based on those. Astro lets you continue to use React but also with partial hydration which can be used to provide an enhanced user experience. SvelteKit offers server side rendering as well as static site generation. See the post on how performance improved switching from Gatsby to Astro for more background.
👨🏽🎓 Gatsby 100 Days Challenge 3: What I Learned #
It's been an unquestionably hassle-free week! I upgraded to Gatsby 3 with no drama at all. Following on from that quick win, I set up a local WordPress site as a headless CMS with no fuss. Then adding Search Engine Optimization (SEO) to the website, integrating the battle-tested and much loved WordPress Yoast SEO plugin was a breeze. All in all, my learnings from Gatsby 100 Days Challenge 3 are:
- Upgrade to Gatsby v3 is surprisingly hassle-free
- Setting up a local WordPress website as a headless CMS is also hassle-free
- leveraging industry leading SEO plugins like Yoast SEO in your headless WordPress Gatsby site is another hassle-free task.
🔥 Gatsby 100 Days Challenge 3: Gatsby 3 — Hassle Free Upgrade #
Upgrading wasn't part of the challenge, but since Gatsby v3 was announced and released this week, I saw this as a great opportunity to try it out. I was truly shocked at how easy the upgrade to Gatsby v3 was. Admittedly this is a skeleton project, but still, I had expected to have to do more. On the whole, the upgrade was smooth and there were few changes to the code. The official Gatsby v3 migration docs give enough detail to get you through.
Gatsby v3 runs a bit smoother than v2. The new image API creates better optimized images, improving user experience (as well as your Lighthouse scores). The new version works with React 17. A benefit of the React 17 upgrade is fast refresh in development . This makes Gatsby v3 faster for developers as well as for end users.
Overall impression? I like it! 💯
🧱 Gatsby 100 Days Challenge 3: Local — Hassle‑free Local WordPress Site #
Development
Last time I had to set up a local development WordPress website on macOS I used MAMP and I remember a lot of downloads as well as a lot of configuration. Things have moved on a lot, and Local (previously called Local by Flywheel) is a game changer . You install the app with only one command:
brew install local
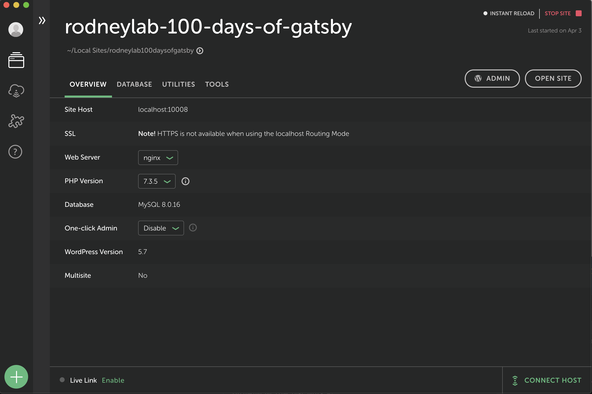
Then to get a WordPress site spun up locally, you just need a few clicks. You can choose your PHP version and set a few other parameters if you want to (see screenshot), but that’s all there is, getting up and running. For instance, you don't have to download PHP, WordPress etc., Local handles all of this. As well as giving you hassle-free WordPress setup, Local lets you SSH into the site if you need to.

🤖 Gatsby 100 Days Challenge 3: WordPress SEO and Gatsby — 5 Steps to Hassle‑free SEO #
Together with the benefits mentioned earlier, Gatsby v3 offers a brand new WordPress Integration . SEO is all about getting your page to appear at first or second position on the Google search engine results page. This is important if you want people to visit your site because 75% of searchers never click past the first page of results . Much of SEO is about writing good content as well as providing a good user experience. On top, there is a technical side. This involves including meta tags in your site markup to let search engines know what your page is about. It is also a tool for getting the right images to show up when your website is shared.
I find this topic exciting, but there is not enough time to go into it here, without making the post super long. Let me know if you would be interested in seeing a post focussed on SEO for Headless WordPress. Anyway, next up, we take a brief look at the steps you need to get going on technical SEO with your headless WordPress powered Gatsby site.
1. WordPress SEO and Gatsby: Install WordPress Plugins #
On your WordPress Site, install the following plugins:
2. WordPress SEO and Gatsby: Create a Post and Ace the Yoast Analysis #
Before we go on, we need some content. To begin with, create a “Focus Keyphrase”. This is the term you will, eventually, want the post to rank for. With that done, start writing the copy for the post. Once you have made some headway, look out for the traffic lights — Yoast SEO will give you top tips on bossing SEO. For example, Yoast will check you do not use the Focus Keyphrase so often that it would harm your ranking. Try to keep beavering away until you get a green light from Yoast.
3. WordPress SEO and Gatsby: Install Gatsby Plugins #
The plugins you installed earlier will expose key post data on a GraphQL endpoint which you can access
via the Gatsby GraphQL API. Install the following plugins on your Gatsby repo:
npm install gatsby-source-wordpress react-helmet
At this point, if you open up GraphiQL and you should see new fields like allWpPost. Even more exciting is that now you can now query data from your WordPress site in your React components:
query BlogPostById( # these variables are passed in via createPage.pageContext in gatsby-node.js $id: String! $previousPostId: String $nextPostId: String) { # selecting the current post by id post: wpPost(id: { eq: $id }) { id excerpt content title date(formatString: "MMMM DD, YYYY") uri seo { metaDesc opengraphModifiedTime opengraphPublishedTime opengraphTitle twitterDescription twitterTitle opengraphImage { altText localFile { childImageSharp { gatsbyImageData(width: 1200, height: 627, layout: FIXED) } } } ogSquareImage: opengraphImage { altText localFile { childImageSharp { gatsbyImageData( width: 400 height: 400 layout: FIXED transformOptions: { cropFocus: ENTROPY } ) } } } twitterImage { altText localFile { childImageSharp { gatsbyImageData(width: 800, height: 418, layout: FIXED) } } } } featuredImage { node { altText localFile { childImageSharp { gatsbyImageData( width: 992 layout: CONSTRAINED sizes: "(max-width: 480px) 480px, (max-width: 768px) 768px, 992px" ) } } } } } # this gets us the previous post by id (if it exists) previous: wpPost(id: { eq: $previousPostId }) { uri title } # this gets us the next post by id (if it exists) next: wpPost(id: { eq: $nextPostId }) { uri title }}
If included in your metadata, the ogSquare Image will be used by some apps such as WhatsApp. This is the image that will appear in the app when anyone shares the link in a chat. If you set the tag and the image still doesn't appear in WhatsApp, let me know. There are a couple of tricks you might need to try out. Specifically, these relate to the order in which your CSS and meta tags appear in the HTML head section.
4. WordPress SEO and Gatsby: Add Meta Tags to your Page #
Next, we use react-helmet (which we installed earlier) to add SEO meta tags to your page's header. We
only look at OpenGraph meta tags here (principally used by Facebook, though other sites/apps use it too).
You will need to add similar tags for Twitter and also SchemaOrg JSON-LD. The most important role of
SchemaOrg is letting search engines know what the page is about. It is important to include it in order
to get rich results in the Google Search Results Page . These are Google features such as a Knowledge Graph, a Featured Snippet or your site being linked to an Answer Box.
import { Helmet } from 'react-helmet'; const FacebookSEO = ({ /* ... */ }) => ( <Helmet> <meta property="og:locale" content={ogLanguage} /> <meta property="og:type" content="article" /> <meta property="og:title" content={title} /> <meta property="og:description" content={metaDesc} /> <meta property="og:url" content={url} /> <meta property="og:site_name" content={siteTitle} /> <meta property="article:publisher" content={facebookPage} /> <meta property="article:author" content={facebookAuthorPage} /> <meta property="article:published_time" content={opengraphPublishedTime} /> <meta property="article:modified_time" content={opengraphModifiedTime} /> <meta property="og:image" content={ogImage.url} /> <meta property="og:image:width" content={ogImage.width} /> <meta property="og:image:height" content={ogImage.height} /> <meta property="og:image:alt" content={ogImage.altText} /> <meta property="og:image" content={ogSquareImage.url} /> <meta property="og:image:width" content={ogSquareImage.width} /> <meta property="og:image:height" content={ogSquareImage.height} /> <meta property="og:image:alt" content={ogSquareImage.altText} /> <meta property="fb:app_id" content={facebookAppId} /> </Helmet>);
5. WordPress SEO and Gatsby: Test then Wait for Google to Crawl your Site #
Even though there was quite a bit of detail here, this was just an overview. So to get a better appreciation,
you might want to take a look at how I implemented the Gatsby 100 days Challenge 3 on the Rodney Lab GitHub page for more details. I hope it has given you an idea of what can be done if it is an area you are not familiar with. Let me know if you would like to do a full post on this. I could create a proof of concept website so that you can see a full implementation.
☁️ Headless & Serverless WordPress #
Surprisingly, the Gatsby 100 Days Challenge 3 has been a great experience. Undeniably, it has got me into WordPress again. I want to use headless WordPress with Gatsby and Netlify on some of my following projects.
There is one barrier, however, which is having to run a WordPress server. While this can be as cheap as $5 a month with a budget host, there is a concern beyond cost. That is, that the server will not be needed most of the time — that's a lot of carbon emissions for nothing. On account of this, I am thinking of running a serverless WordPress setup. The server would spin up whenever the site content wants editing, so I could run a Gatsby build. That way it would only run when needed. Just wondered if anyone has tried anything similar to this and what the results were compared to a using hosted server. Please let me know!
🙏🏽 Gatsby 100 Days Challenge 3: Feedback #
I hope you found this post useful on the whole. Are you also working on the 100 Days of Gatsby Code 2021 Challenge? Would be undeniably keen to hear what you got out of the experience. Also, if you have any tips or ideas related to this post, would love to hear them. Let me know via @askRodney on Twitter, askRodney on Telegram or see even more ways to get in touch with Rodney Lab. If you have found this post useful and can afford even a small contribution, please consider supporting me through Buy me a Coffee.
We post regularly on online privacy and security hacks, as well as website development. Subscribe to the newsletter to keep up-to-date with our latest projects.

